Introducing the Pioreactor XR

:wave: Hello!

We have an exciting hardware release today - the Pioreactor XR upgrade kit for both the 40ml and 20ml v1.5s. This upgrade kit extends the range of OD on the Pioreactor, allowing you to measure 100x lower and 10x higher density cultures than our standard optics.

We accomplish this by adding two new OD sensors at the 45° and 135° scattering positions, along with the standard 90° sensor. The new 135° sensor is most sensitive at very low densities - ideal for cultures in the early growth phase. The 45° sensor is most sensitive at higher densities - great for late-stage growth in cultures. The 90° is sensible in between these extremes - neither very low or very high. Our latest software update has a routine to combine these three sensors - 45°, 90°, and 135° - into a single reported OD value.

Here’s some data on how the different sensors react to orders-of-magnitude culture density. FYI the upper end is about 40 OD600 - in theory, you can calibrate beyond this too.

Learn more about the Pioreactor XR on our blog:

6 Likes

Looks interesting! I was wondering if it is also possible to use this on older pioreactors (v1.0) by sacrificing the REF sensor and putting it on the 45° position. Do you think the routine would still (properly) work to report a single OD value?

@stijn.rommens, in theory, yes, but it might take some extra configuration. Here’s a broad overview of what you would need to do:

  1. First, you need to be on the latest (unreleased-but-soon-released) software
  2. Create a new model, with model_name eqaul to pioreactor_20ml_XR and model_version = 1.0.
  3. On the Inventory page, change your Model to the new pioreactor_20ml_XR - you may need to restart the Pioreactor first though.
  4. In your config.ini, set
[od_config.photodiode_channel]
1=45
2=90
3=
4=
  1. Place the PD from channel 1 into 45deg pocket.
  2. Perform the “OD Fusion” protocol (new in the software release)
  3. I think that’s it? Turn on OD reading and watch!

Hi Cam,

Would it be possible for your team to publish in house experiment results where you compare these combined measurements to a ground truth. Ideally dry mass values or external spectrometer OD values (with dilution as required) at different stages of growth.

There is an even simpler way of validating results I have ran in the development of my own sensor. Basically grow a culture to as dense as you can. Measure dry mass. Then write a dilution script were you can pump in water to reduce that density to a known amount. Continuously measure density as you dilute. Compare the reported OD values with the expected theoretical. You’ll have to have good mixing between dilutions for this to work effectively otherwise there will be a growing discrepancy in the comparison as dilution progresses.

This is so perfectly timed I wonder if you’re spying on us :wink: thank you!

The theoretically best way the community has come up with to calibrate arbitrary units for cell density is with silica beads: Calibration Protocol - Plate Reader Abs600 (OD) Calibration with Microsphere Particles.

Different sized cells will scatter differently, and different spectrophotometers will read differently as well, so there isn’t really a one-size-fits-all way. Perhaps a pragmatic balance might be a calibration plugin that does exactly as rafik says and calibrates for a person’s particular cells to gDW?

Yea I think a very in-situ protocol can be develop in the Pioreactor software to handle this. We’ve suggested the standards approach of having N vials with known OD values. (For our in house experiments, we are using dry bakers yeast to make these standards). However, @noahsprent is right that cells in different stages can scatter light differently based on morphology, so a highly specific calibration would have to be performed during growth.

Wow this is really coming full circle, here are some thoughts:

There is no alternative as certain as just doing a true dry mass calibration for cells being grown. It is time consuming to filter out the samples, and dry them. Would likely be difficult to do at pioreactor volumes as you need a decent sample size at low densities to be able to weigh it reliably.

Glad you think the dilution method above is a good idea. I can share some test results of what happens when you have inadequate mixing if interested.

Using preweighed calibration samples such as the silica microspheres and dry yeast is simpler. Funny enough ive considered both of these sample options, but ended up going with the yeast. Im glad pioreactor does the same thing as I wasn’t very confident in that decision. The igem measurement kit referenced in that protocol uses silica spheres that are too small imo (950nm), at least as a ref for the cells I work with. They can be purchased in different sizes and in dry form from chinese vendors but I have not explored this avenue.

@CamDavidsonPilon could you share the density range in g/L that this upgraded version is responsive in when tested using the bakers yeast.

The chart posted above shows this off (just convert to g/L). In theory, you could go further in both directions (the graphs suggest this). The fusion algorithm we are using doesn’t care so much about linearity, or humps, but instead cares about the triplet of positions.

The approach makes sense. Linearity doesn’t really matter if you assume calibration is being used and you have a combined responsiveness. My bad did not look at the chart closely at first. Range showed of 0.002-25 mg/ml (g/l) is impressive.

An interesting metric you could calculate/display could be “accuracy” as it looks like responsiveness is different along the density range. Could you post the normalized od plot for this experiment that shows the combined result of these 3 lines that the KF spits out? I guess the combined slope will show that responsiveness.

One strange thing is that the 90 degree is more responsive in your plot than the 135 degree at the lower density range. Shouldn’t it be the other way around as 135 has a larger absorbance (instead of reflectance) component which should be more responsive as low densities?

Maybe I’m not presenting this data correctly? 135 (purple) is higher and not-flat => more sensitive at low densities. If we extrapolated further left, I imagine 90 (red) would fall below the lower-limit of detection, or flatten out, before 135.

You make a good point. You do get a stronger signal from the 135, but I would argue that positive slope is what you care about more indicating responsiveness. That said, the slopes of 90 and 135 look initially identical, and the 90 line goes slightly further in the higher density range. Perhaps 135 can go further to the left but I wouldn’t expect that any inoculation starts below 0.002g/L.

It could be the case that the 135 is less noisy at lower densities making it more reliable, not sure what post-processing steps were taken on these results.

If you agree with my positive slope argument representing usable range, doesn’t this mean that the 45 degree signal is the “best” only between 10^0.2 to 10^1.05 mg/ml (roughly 1-11 mg/ml). The negative slope is detrimental, as now you have 2 densities that correspond to the same OD reading?

If you have it handy, it would be interesting to look at the combined fusion result for this plot.

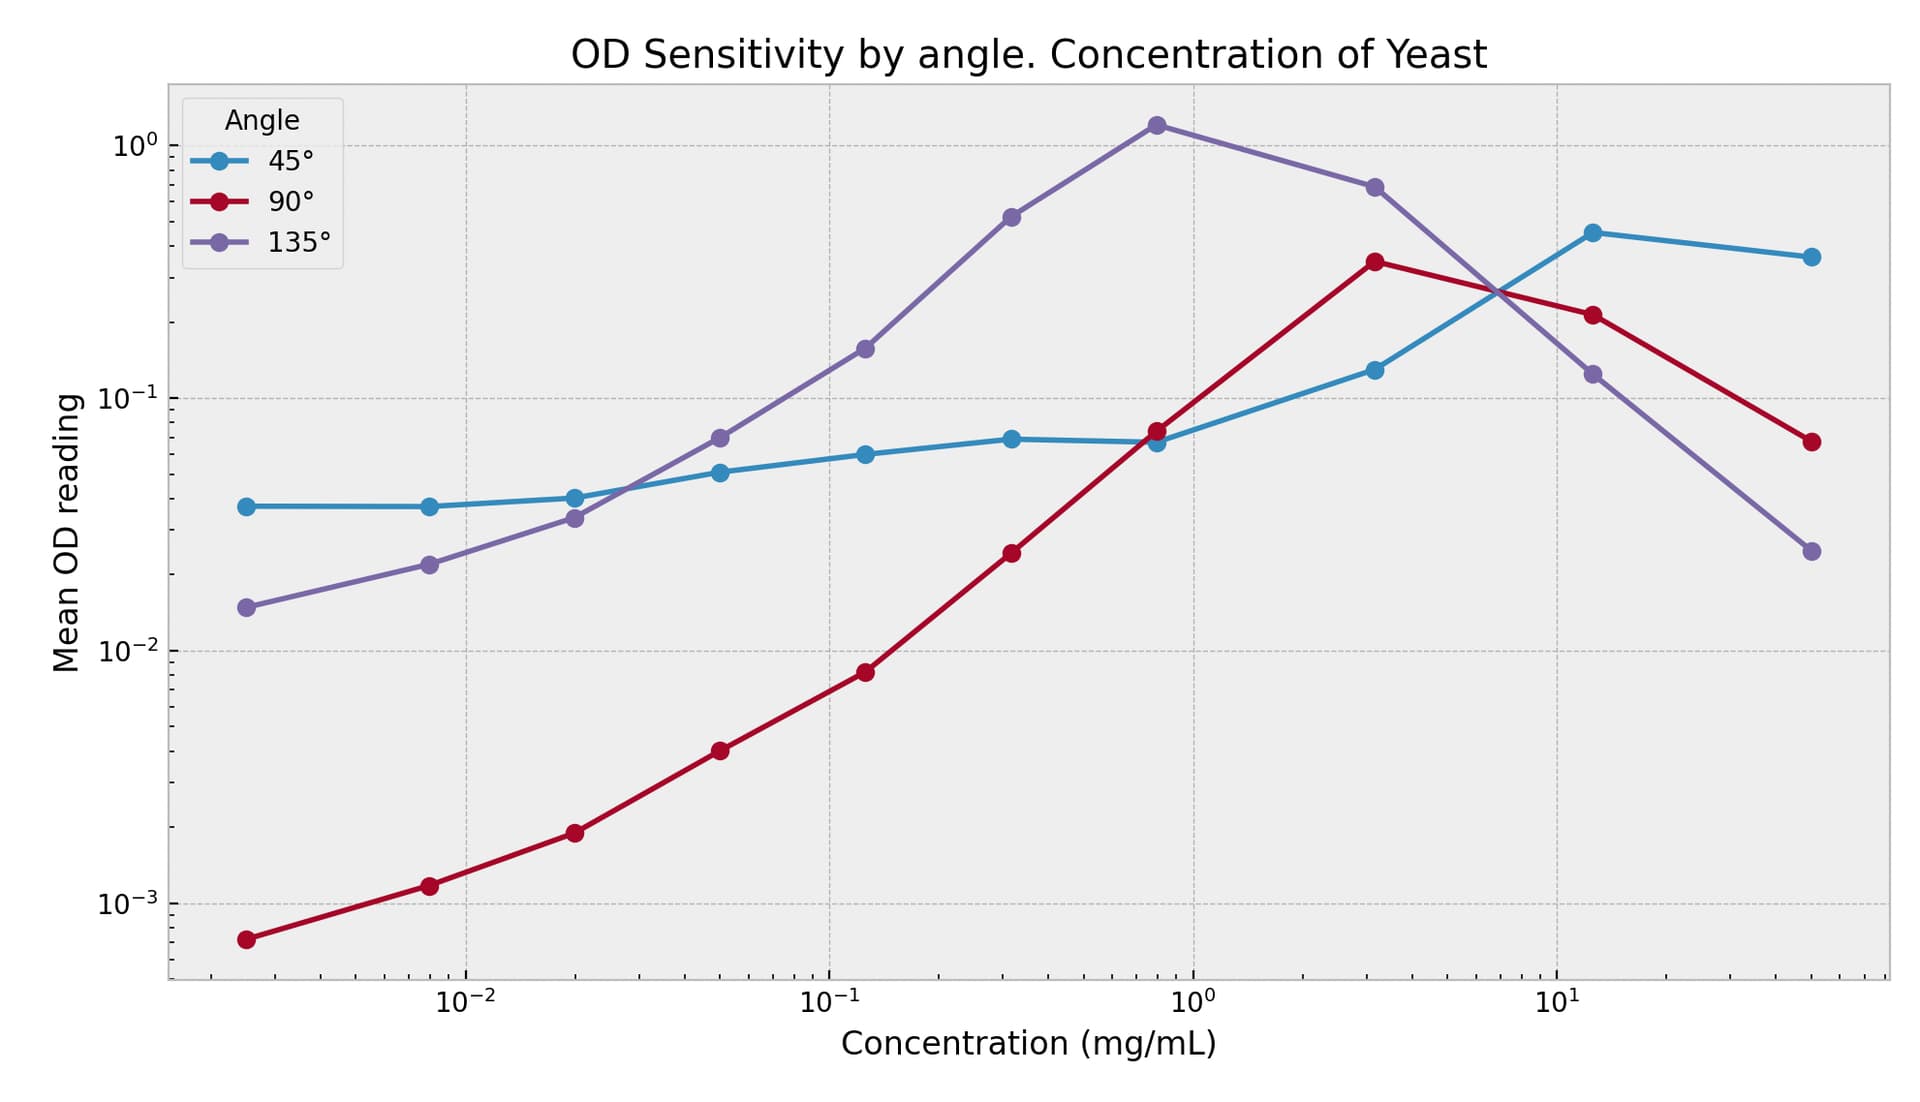
So the approach we take in the fusion is using the invertibility of the triplet to map to a concentration. To simplify first: if we had a single signal, for example the 90deg, then there exists a un-invertible problem: if you see 10^{-1} OD reading, then is that [10^{0}] or [10^{1.5}]? Both are possible. If we double the sensors, then we have a pair of sensors that may more often uniquely map to the single concentration. With three sensors, we get even more invertibility of the triplet.

The above implies that either positive or negative slops provide information since the sensor is changing with the density changing. Note then that a flat curve provides nil information. So 45deg in the low density regime isn’t very useful.

Another factor in the invertibility problem is noise. A positive slope, but very noisy sensor, can’t provide much information since we can’t rely on where the signal actually is. In practice, we see that sensor noise decreases with increasing density.

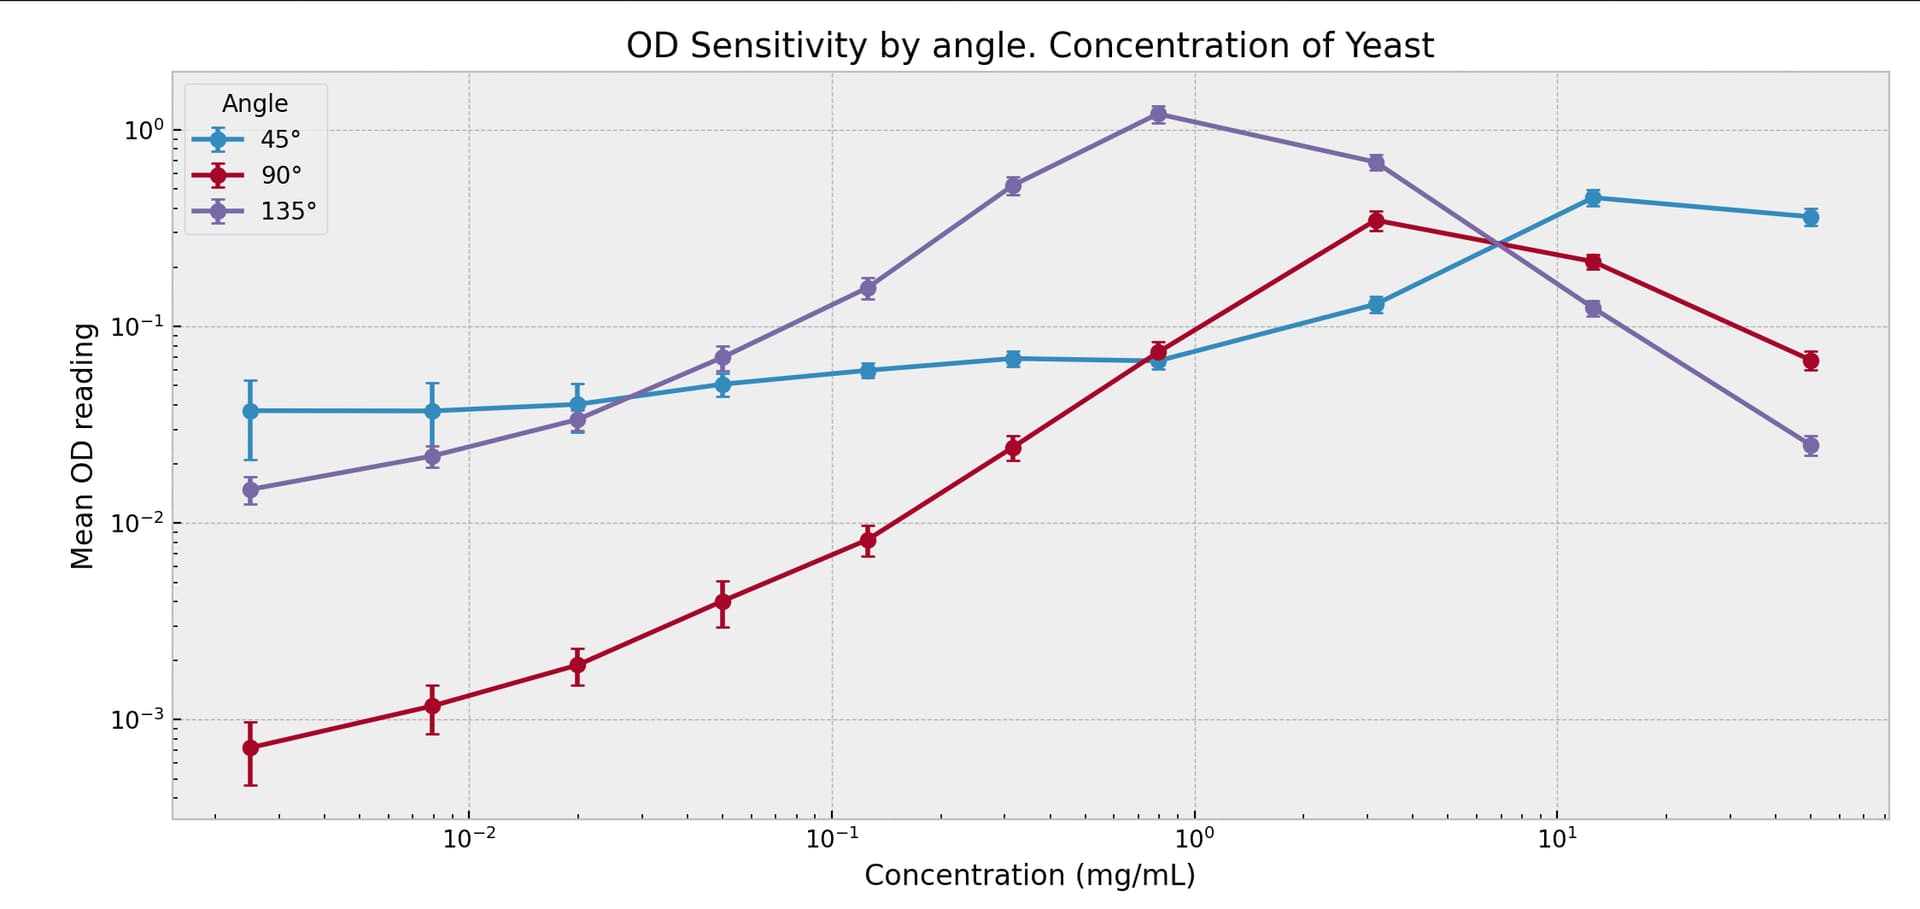
Here’s a chart with some error bars:

So to produce an od-fusion, we have, for each angle:

  1. an estimated curve
  2. a variance estimate around that curve

and together this produces a statistical model of the following: for a given density, what is the distribution of the triplet of signals?

We want to opposite though: given an observed triplet of signals, what is the density? We can perform a maximum-likelihood on this statistical model to estimate the density. If a region of the curve is flat, or has high variance, it doesn’t contribute much to the likelihood, and gets downweighted naturally. Ex: in the low density regime, our model probably doesn’t use 45 for inference, and probably not 90 much as well.

The nice thing about this approach is that we don’t need to manually pick and choose which sensor to use in which regime. The model is flexible enough to do that for us.

If you have it handy, it would be interesting to look at the combined fusion result for this plot.

So this wouldn’t be interesting! It would be a straight line between density and od-fusion! In a simulation, I would sweep over the density => produces the triplet => goes into the model to produce the od-fusion => naturally gives the maximum-likelihood equal to the density.

This is awesome! So in a sense you are doing a triangulation using the 3 readings to find the density.

I haven’t looked at the calibration script in a while. Does it essentially now save the reading for each channel separately for each density point?

What happens if you keep going to densities higher than the ones shown in this plot.

It’s probably changed a lot since then, and was recently updated again in 26.1.30 release. But yes, we save each data point (three per standard - actually we take a few readings per standard now), and construct curves + std. error curves from this data.

The fusion code is here: pioreactor/core/pioreactor/utils/od_fusion.py at master · Pioreactor/pioreactor · GitHub

What happens if you keep going to densities higher than the ones shown in this plot.

I don’t know. I imagine they fall very quickly to zero, starting with 135, then 90, then 45 much later. Users can probably calibrate further out than what I’ve shown, but there-be-dragons!