Hi @DonalC and @drsingleton,
(sorry about the late reply, I was waiting until I had more information to share).
First, some terminology and understanding for us: a computer, like a Pi, has networking interfaces. For example, the onboard wifi on RPi’s is one such interface. The larger, model Bs, have an ethernet connector, which is another interface. Each interface can connect to 0 or 1 networks.
Second: wpa_supplicant.conf is deprecated in the latest RPi software, which we use. If you see a tutorial mention wpa_supplicant, it’s old and not applicable. NetworkManager, via the tool nmcli, is the new way to manage connections.
Using an external wifi device
The local-access-point is a good bootstrapping trick, but does scale poorly. The RPi’s built-in antenna isn’t very strong, and generally isn’t designed for lots of connections. As alternatives, we suggested users buy an external router (even cheap ones work fine) and connect all the units to this router.
Another option that I was just experimenting with is using a USB wifi device, like this, plugged into one of the Raspberry Pis in your cluster (it doesn’t need to be the leader). Simply: this adds another networking interface to your Raspberry Pi. A dedicated device like this has better range, and will allow connecting more devices to your local-access-point.
Note, (and we’re about to get nerdy) the current Pioreactor image is using Linux kernel version 6.1. With this kernel, to use this wifi device, you need to compile the driver - this is not something I expect you to do. Luckily, I am able to upgrade our Pioreactor image to Linux kernel 6.6, which does have support for this driver out-of-the-box. Literally, I just plugged in the USB device, and my RPi detected it right away and I could connect to networks with it. The image upgrade will come in our next release (next week?), however it requires a full image rewrite (but this can happen on a worker, and plug the USB into that worker and turn on the LAP on the worker).
As a bonus: with this attached to my RPi, I was able to have two wifi interfaces simultaneously: one creating an access point, and one connected to an external network. Note the “wlan1” and “wlan0” below.
Connecting to eduroam
Disclaimer: I believe all university networks are a bit different, so what’s below may not apply elsewhere.
I recently got a cluster of Pioreactors working on a local universities eduroam, so I can share what worked there.
We talked to the IT team and they had a system for connecting wired devices to the eduroam network (a wired connection is ethernet, so that requires a RPi B model). For this cluster, that worked fine, since we were hosting the leader on an RPi 4B for best performance. The IT team need a few things from us:
-
The ethernet MAC address of the RPi 4B. The MAC address is a hardcoded identifier that doesn’t change. This is easy to find on a Pioreactor. Two options:
- if able to access the UI (ex: turn on the LAP, and log into the UI), it’s on the Inventory page. Make sure you are looking at the ethernet MAC address, not the WLAN (wifi) one.
- Even simpler: during boot up of the Pioreactor, we write a file to the SD card called
network_info.txt. Once the Pioreactor finished booting, unplug it, remove the SD card, and put the card into your computer. In the bootfs folder is that file network_info.txt - this has the ethernet MAC address.
-
They wanted to now about access to this device.
- If the Pioreactor is on eduroam, it’s also broadcasting the web UI across eduroam. They wanted us to change the
port of the web UI from 80 (the default) to something else. Recent versions of Pioreactor software allow this, and it’s easy to do.
- they also wanted us to change add some firewalls - this is easy (since you control the OS) and I’ll someday soon write docs on how to add this.
-
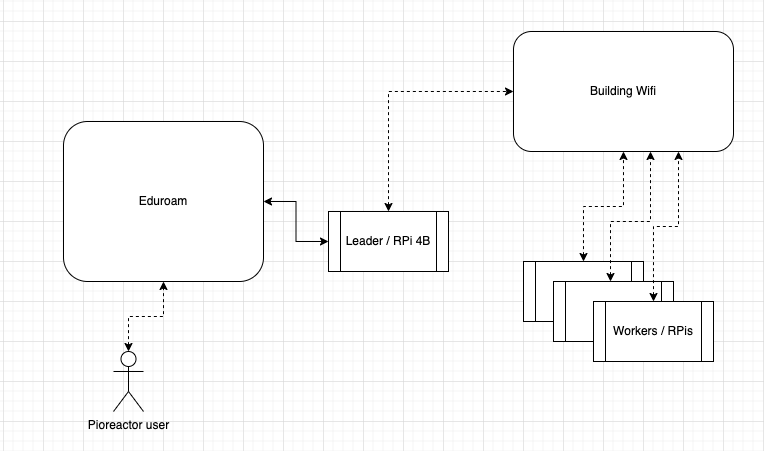
They wanted to know how we will connect the other Raspberry Pis. We suggested that the leader (who is connected over ethernet to eduroam) create its own local-access-point and all the workers connect to that. This is possible because the RPi 4B has two networking interfaces: an ethernet and a wifi. IT was so-so on this idea - they don’t like lots of rouge wifi networks. Instead, they had a small wifi network available in that building that we could use.So we connected the leader’s available wifi interface to that network, and the workers to that network. Here’s a diagram:
(But you can perhaps see how a local-access-point would work here, too, instead of “Building wifi”)
Once they were happy, they provided an IP address for the leader, so when it was plugged into their network, we could go to http://129.45.0.12:8080 (for example), and we could see the UI and interact with the workers. Also, this leader had access to the internet.
There are details I skipped around connecting workers in this setup above, but I’m available to explain more (and eventually write some documentation).
Finally, we are dedicated to make all this easier for users. I believe the Pioreactor is a great tool expect for these networking hurdles. Happy to answer more questions and get feedback here, too.

